For people who are looking for a serious hobby, model railroading is a great choice. This hobby involves model trains at a reduced scale. Just like any other hobby, this would consume your time but may prove to be very entertaining.With prolonged exposure and great ideas, you will be able to understand the appropriate designs for a presentable model. Soon you will be joining exhibitions and contests.
How do I start Railway Modeling?
All hobbies start with the desire. Your desire to learn more about the hobby and discover new things that will keep you hooked on your model trains.
You will start by learning how to create a permanent layout. A permanent layout is necessary for you to have in order to avoid packing and unpacking your setup. In creating a layout, there is no correct way to build a model railway. There are varieties of method on how to go on with this. Included in process of building the layout is to know the concept of scales and gauges. Scale is the term used in when referring to the size of the model compared to its full size version. Gauges, on the other hand, are the measurement between the rails on the actual or model track. Typical scales used are the HO and N scales. HO scale is built 1:87 scale while the N scale is built 1:160 scale.
Starting the Layout
For beginners, the starting point would be the board. If you lack skills in carpentry, you should be able to make a board that is easy to build or a ready-made one. Ideal sizes would be that of a table tennis table.
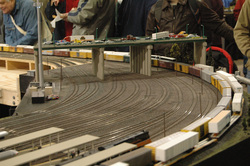
With your baseboard in place, the next step is to lay down the track. The rails can be nailed straight to the board. A rail underlay is commonly placed to provide a good surface to on which the rails would be laid. This is also placed to regulate sounds and increase aesthetic value. Extra care is taken when laying down tracks in curves.
Putting Your Track Work to Test
After finishing your laying tracks, it is advisable to put it to test by rolling a carriage along. Place your train on the rails with power pack on. See the train navigate the track and check for possible sites of derailment. This is the perfect time to fix these problems before placing the ballast and sceneries.
Adding the Sceneries and Ballast
This is the part where you place the designs that would make your model visually appealing. The sceneries will create this effect for the railway. Common elements that are part of the sceneries are grass, road bridge, hills, roads, and more.
(Want to be more creative? Check this out.)
Materials in making sceneries comprised only of common house items. The grass can be made up of a green mats. The roads can be made of thick cards. Polystyrene foam can be made to create hills.The ballast is to be placed next to improve stability to your rails.
You may also add new ideas and designs to your model by placing more details such trees, cars, and fences.
How do I start Railway Modeling?
All hobbies start with the desire. Your desire to learn more about the hobby and discover new things that will keep you hooked on your model trains.
You will start by learning how to create a permanent layout. A permanent layout is necessary for you to have in order to avoid packing and unpacking your setup. In creating a layout, there is no correct way to build a model railway. There are varieties of method on how to go on with this. Included in process of building the layout is to know the concept of scales and gauges. Scale is the term used in when referring to the size of the model compared to its full size version. Gauges, on the other hand, are the measurement between the rails on the actual or model track. Typical scales used are the HO and N scales. HO scale is built 1:87 scale while the N scale is built 1:160 scale.
Starting the Layout
For beginners, the starting point would be the board. If you lack skills in carpentry, you should be able to make a board that is easy to build or a ready-made one. Ideal sizes would be that of a table tennis table.
With your baseboard in place, the next step is to lay down the track. The rails can be nailed straight to the board. A rail underlay is commonly placed to provide a good surface to on which the rails would be laid. This is also placed to regulate sounds and increase aesthetic value. Extra care is taken when laying down tracks in curves.
Putting Your Track Work to Test
After finishing your laying tracks, it is advisable to put it to test by rolling a carriage along. Place your train on the rails with power pack on. See the train navigate the track and check for possible sites of derailment. This is the perfect time to fix these problems before placing the ballast and sceneries.
Adding the Sceneries and Ballast
This is the part where you place the designs that would make your model visually appealing. The sceneries will create this effect for the railway. Common elements that are part of the sceneries are grass, road bridge, hills, roads, and more.
(Want to be more creative? Check this out.)
Materials in making sceneries comprised only of common house items. The grass can be made up of a green mats. The roads can be made of thick cards. Polystyrene foam can be made to create hills.The ballast is to be placed next to improve stability to your rails.
You may also add new ideas and designs to your model by placing more details such trees, cars, and fences.
 RSS Feed