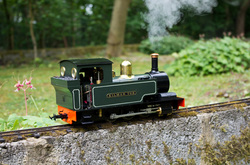
Creating a model railway is a popular hobby worldwide. Inspired by the elegance of trains and railroads, these models are life-like in details and prove to be a worthwhile pastime. This pastime has also evolved from a simple hobby to an earning opportunity for railway model enthusiasts.
Model railway Basic Concepts
There are basic concepts that you will encounter in this hobbies. Scale and gauge are often heard in talk of model railway. The gauge is actually the distance between rails. Scale is the ratio of the model to actual trains. These two terms are often mixed up.
Typical scales used in rail models are N and HO scale. N scale is built with a 1:160 ratio. On the other hand, HO scale is usually built with a 1:87 ratio.
A railway model often starts with a layout. The layout is planned to know exactly where you put the parts of model. You will assign a space for your train station model, paths of the railways, position for the details, and more. Aside from the plans, the layout is also needed for you to avoid packing and unpacking of the setup. With proper arrangements made, the layout will surely keep everything in place.
Actual Construction
First and foremost, you will need a board. The board is where the actual layout will be placed. You should choose the board that will accommodate the designs that you wanted. The size of table tennis is often used. There is no actual limit required for the size. Ready to use boards are suggested for beginners who lack carpentry skills.
After preparing the board, you may now continue with placing the rails. The rails are often nailed to avoid derailment of the train. You can also place rail underlay. This is commonly placed to regulate the sound of the moving train when it is on the move. Another purpose of the underlay is to smoothen the surface of the board and allow better placement of the rails.
Know the tips in choosing the right rails for your model on this model railway guide.
Increasing Aesthetic Value
It is a wise idea to add details to your model. Aside from the rail road, details such as the trees, fences, cars, and houses in your railway model attract people. You can also place landmarks, bridges, and parks. These details can be made of common house items. You just have to be creative to make this work.
One way to make the railway look more realistic is by adding ballast. A ballast not only increases aesthetic value but also placed to increase the stability of the model railway. Placing ballast is a challenge. Adding glue as adherent will not work. This is because some of its particles do not make contact with the glue and remain loose. To solve this, you have to make use of PVA wood glue. This glue is diluted 1:1 with water and dishwashing liquid. The glue will be dropped with an eyedropper. It is important to be careful in handling the ballast. Its particle can be glued moving parts causing problems to your model.
 RSS Feed