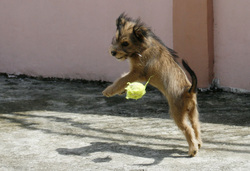
 If you are looking for a guide on how to train your dog to be a guard dog or just interested in teaching your pet simple tricks, this page is definitely for you. Dog lovers nowadays always find a way in making dog and man interaction more fun and exciting. A new and rising fun team sport is dog agility. Dog agility involves equipments and obstacles that put your dog’s skills to test. Starting Your Own Course Dog agility equipment is designed to create an environment that would encourage a healthy and active lifestyle for you and especially for your pet dog. In starting your own dog agility course, you must have sufficient space for your dog to move around. Your backyard is an excellent area to set up your obstacle course. ( Click here for the report.) Once you have a space that can hold your dog agility course, you may now start choosing the equipments you need. Several recognized bodies in dog agilities have designed their own obstacles for dog agility. One of the most common obstacles you will see in dog agility courses are jumps. Jumps are further classified into different heights which are determined by the dog’s height on its withers or shoulders. Common jumps are standard jump, wing jump, long jump, and tire jump. Another challenging equipment for your dog is the tunnel which is perfect for puppies. Contact obstacles have yellow contact zones on each of the equipment. In using this obstacle, it is needed for the pet dog to have at least one paw in each contact zones when they get on and get off the obstacle. Lastly, weave poles are obstacles designed to be passed in zigzag manner. The dog must not miss a pole to correctly surpass the obstacle. The Course for Your Pet Courses vary for each dog. There are certain athletic requirements to be followed for each course. Breeds that are naturally less agile are rarely seen in dog agility courses. There are also requirements such as age and height that are to be fulfilled. Why Participate? Dogs are naturally able to wander around. They hunt by running and chasing preys in their search for food. They jump inside bushes and climb up steep slopes. With domestication, they are deprived of this freedom in their crates and cages. Dog agility courses allow them to run around freely following their natural instincts. The courses mirror obstacles that are seen in nature. Dogs are not the only one who benefits in this activity. Dog owners will run alongside their pets. They also instruct and assist their pets in passing tunnels and jumping obstacles. With such strenuous activity, your body will surely get a decent cardiovascular exercise. The course also promotes stronger bonds between the dog and its master. The course is created in a way that the dog will need you to complete the course. It relies on your instruction passing the obstacles. This will exercise the trust of the dog to you. Your communication will improve on the process.
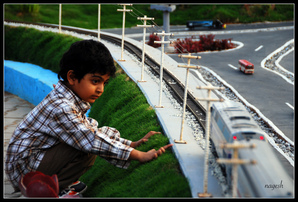 Toy trains are fascinating pastime for many people. But this activity is not only a simple pastime. This requires variety of skill in order to have a successful railroad model running. Railroad model enthusiast takes a step further by spending incredible amount of resources to make their models seem life-like. Starting Your Own Railroad Model There are several elements one must keep in mind before starting your railroad. First is a good theme. A theme creates the over-all feel for your layout. A winter theme will feature pine trees, snowy plains and hills. You may also capture the themes of famous railroads. The Orient Express that runs from Paris to Istanbul and Indian Pacific that connects east and west coasts of Australia are good railroads to mirror. Many more ideas can be added to your railroad to make it more alive. ( Read this news about new trends on model trains.) For beginners, smaller layout sizes are advisable. A sufficient space to display the layout is enough. As you gain more experience, you can aim for a much bigger project that will consume larger spaces. Exhibitions of enthusiasts often occupy a large room. As a beginner, a smaller scale will be used for your model. To compensate for the smaller layout, you have to focus more on the sceneries and settings. Next is to plan the track. There are numbers of ways to design your track. You can sketch several plans and carry out the plan you are most happy with. Track plans include placing bridges, tunnels, forking roads, and other details. The type of the tracks to be used can also be considered during the plan. The tracks vary in sizes, designs, and other features. You may also adapt your rails especially in curves of the track. A display bench is also required. You can estimate the size of the display bench you want by test running on the ground. By doing this task, you would also have an idea on how much space to assign to the settings and sceneries. Putting the Plan into Work In creating the display bench, you need materials and little carpentry skills to accomplish the task. The materials needed are available in the market. If you lack carpentry skills, ready-to-use materials are advisable. The trick in creating a toy train table is to make it strong. A strong display bench will save you of troubles in the long run. A good way to estimate the strength required for your table is by placing your own weight on the table. Events such as fixing the model parts or rails will force you to put weights on your display bench. With the display bench in stable condition, you will now place details to your railroad model. You have to cover the track work with a masking tape and laying newspapers to cover the exposed areas of the board. This step is done to ensure cleanliness of other model parts throughout the process. Each detail requires specific measures to take in order to have a decent railroad model.
 If you are one of those people who find training their dog fun, you have come to the right page. The lessons one will teach can be practiced anywhere – in your living room, in the halls, and outdoors. In teaching tricks to your pet, it is important to remember that tricks should be performed in short sessions. This is done so the pet could have ample of time to rest. You should also keep the training fun for you and your pet. The moment you spent with your will contribute to your healthy bond. Reading the Body Language Dog obedience training is all about communication. To become a better dog trainer, you should also be able to read the dog’s mood. Your pet could be tired, stressed, or scared. Signs like these often require you to cease the training. Or else your dog will be vulnerable to diseases or present signs of aggression. Reading the body language involves observing every aspect of your dog. You monitor the pet’s facial expression, noises it makes, and body postures. The dog will utilize its tail, mouth, and eyes to express what it feels. By learning these, you will know what the pet is feelings so you can address its wishes. The dog’s eye when half closed indicates signs of submission or pleasure. Eyes wide open indicate aggression. Never try to outstare your dog when this happens. The tail is a lot harder to read but generally a wagging tail often expresses pleasure and friendliness. There is no exact way a dog holds its tail. This behavior varies from breed to breed. However, when the dog waves its tail stiffly and slowly, it shows an angry expression. Dogs often want to play. It expresses this either by raising a paw, by barking, or by bowing down. It might also offer a toy or jump over other dogs to instigate a chase. In general, if your dog is feeling aggressive, it will make itself look larger by standing up with its tails and ears sticking upright. A submissive dog often does the opposite. It makes itself look small and behave like a puppy. In addition, this instructional video will show to you proven dog obedience training that will benefit you and your pet. Teaching Correct Behavior Pet dogs learn by association. The trick is to reward or praise the dog every time it does something nice. With this method, the dog will more likely repeat the action. Reward it with dog treats or praise it excessively. With the basic concept in dog obedience, you may now begin teaching your pet what it can and cannot do. Dangerous behaviors should be discouraged by telling your pet “No!” This is enough to get the dogs attention. Acts of violence and frequent shouting will not help your dog learn. It is also important for your dog to know when to bark. The trick here is to teach the dog when to stop.However, commanding “Stop barking” should be not be used as an act of reprimanding.
 To start off any hobby, there is a need to think of possibilities that could grow from the hobby. Will this hobby increase certain skills such as creativity and resourcefulness? These are important thoughts to consider before jumpstarting a hobby. If you are in search of a serious hobby, give railroad modeling a try. Railroad modeling is hobby that involves mirroring actual train and railroads into model railroaders. Other enthusiasts, however, finds it more interesting and challenging to create original railroads. Whatever method each enthusiast prefers, they find railroad modeling a good activity to spend their time on. Picking the Model Train Theme A theme gives your railroader model the feel, look, and functions.It is important for you to decide a theme in order for you to be comfortable and find more enjoyment in this hobby. When starting a theme, you would ask for specific details in your model. Basically, choosing the theme is knowing what you want in each components of your design. When choosing a train, you would consider the model of the train. The train is the center of your model and will dictate the whole feel of the railroad design. Famous options are old style train set and electric or diesel powered modern trains. The trains could contain either passengers or products like coal and livestock. Your theme also covers the types of sceneries you would put. If you decide on making an urban theme, you will be placing miniatures of buildings and skyscrapers. If you lean on the rural theme, mountainous terrains are great details to place. In deciding the theme, you would also encounter terms such as scale and gauge. Despite its differences, these terms are often mixed up. The scale is the term used to compare the size of the model to the actual train. It is often expressed in terms of a ratio. The most common scale used is 1:87th scale. The gauge, on the other hand, is the measure between the rails on the actual or model track. Creating the Structures of the Concepts With all of the concepts decided, it is now time to start placing structure to the idea. You can start over in producing the scenery. First, you have to find a board to place your layout. The board layout is needed for you to do away with packing and unpacking the model. The size of a board is variable. For beginners, small boards are advisable. As you spend more time and gain more experience on this hobby, you will think of bolder projects that will need larger boards. The trick in creating your board is to make it sturdy. By sturdy, meaning it can accommodate heavy weights such as your body weight. At times you will have to place you’re your weight over the board to make repairs and reach for certain spots. To create a more realistic look for your model, you should try placing ballast. Ballast is not only pleasing to the eye but also creates more stability for your tracks. Placing the ballast requires special methods because some particles of the ballast do not make contact with the glue.
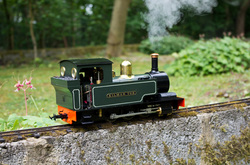 Creating a model railway is a popular hobby worldwide. Inspired by the elegance of trains and railroads, these models are life-like in details and prove to be a worthwhile pastime. This pastime has also evolved from a simple hobby to an earning opportunity for railway model enthusiasts. Model railway Basic Concepts There are basic concepts that you will encounter in this hobbies. Scale and gauge are often heard in talk of model railway. The gauge is actually the distance between rails. Scale is the ratio of the model to actual trains. These two terms are often mixed up. Typical scales used in rail models are N and HO scale. N scale is built with a 1:160 ratio. On the other hand, HO scale is usually built with a 1:87 ratio. A railway model often starts with a layout. The layout is planned to know exactly where you put the parts of model. You will assign a space for your train station model, paths of the railways, position for the details, and more. Aside from the plans, the layout is also needed for you to avoid packing and unpacking of the setup. With proper arrangements made, the layout will surely keep everything in place. Actual Construction First and foremost, you will need a board. The board is where the actual layout will be placed. You should choose the board that will accommodate the designs that you wanted. The size of table tennis is often used. There is no actual limit required for the size. Ready to use boards are suggested for beginners who lack carpentry skills. After preparing the board, you may now continue with placing the rails. The rails are often nailed to avoid derailment of the train. You can also place rail underlay. This is commonly placed to regulate the sound of the moving train when it is on the move. Another purpose of the underlay is to smoothen the surface of the board and allow better placement of the rails. Know the tips in choosing the right rails for your model on this model railway guide. Increasing Aesthetic Value It is a wise idea to add details to your model. Aside from the rail road, details such as the trees, fences, cars, and houses in your railway model attract people. You can also place landmarks, bridges, and parks. These details can be made of common house items. You just have to be creative to make this work. One way to make the railway look more realistic is by adding ballast. A ballast not only increases aesthetic value but also placed to increase the stability of the model railway. Placing ballast is a challenge. Adding glue as adherent will not work. This is because some of its particles do not make contact with the glue and remain loose. To solve this, you have to make use of PVA wood glue. This glue is diluted 1:1 with water and dishwashing liquid. The glue will be dropped with an eyedropper. It is important to be careful in handling the ballast. Its particle can be glued moving parts causing problems to your model.
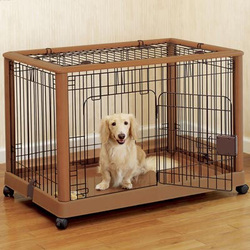 People have varying opinion regarding crate training a puppy. Some people see it as an act of cruelty. To them, it restricts the freedom of the animal. But to many, with understanding of taking care of pet dogs, crate training is very helpful. Choosing the Right Crate Choosing a crate is a very important part and dictates the well being of your pet. The crate will serve as a home for your pet for a period of time. You should choose your crate wisely and adjust it according to the needs of your pet. There are various types of crates. Each has its own advantages. The wire crate is the most common type of crate used in crate training. It provides visibility of the whole crate. It is also made of versatile materials; it makes the crate easy to carry around and provide additional space when needed. Another type of crate is the soft-sided crate. Like the wire crate, soft-sided crate is also lightweight and very suitable for carrying your pet around. The downside of this crate is that the dog will learn the habit of chewing or scratching the sides of the crate. This is not suggested for puppies. Plastic crates are the ones used in sniffing dogs such as canine. This crate is strong and ideal for large pets. The problem that one can see in this crate is that it has three side enclosed limiting air circulation. The crate also has areas that are hard to clean. (You can also consult this dog training eBook to learn more on choosing the right crate for your dog.) Confining with Comfort After choosing the right crate, you may now throw in the basic needs of the puppy. This includes water, old blankets to act as padding, toys, and treats. In introducing the puppy to the crate, it is essential to do it in an unhurried manner. Let it explore the crate without being rushed. Throw treats inside the crate. Close the door and take a minute to observe. As soon your pet keeps calm, let it out of the crate. This is also a way on how to train your dog not to bark. Repeat the steps and increase the length of time the dog stays in the crate. The dog will associate the crate as a place it as a safe haven. Give praises once in a while and reward with treats every time it enters the crate. Repeat this process until it gets comfortable with the crate. As the puppy gets more comfortable with the crate for about 30 minutes, you may now start leaving it inside the crate for longer periods. There is no general rule on how long a puppy should stay inside the crate but it is advisable not to crate puppies for longer than six hours. You should give time for your pet to relieve itself. Praise it excessively afterwards. This is done not only to diminish the chances of accidents in your home, but it also gives an idea to your pet that going to bathroom outside the house will result in praises.
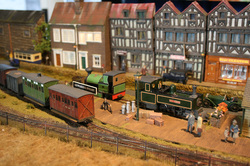
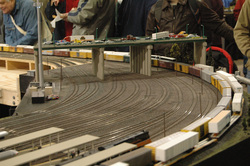 For people who are looking for a serious hobby, model railroading is a great choice. This hobby involves model trains at a reduced scale. Just like any other hobby, this would consume your time but may prove to be very entertaining.With prolonged exposure and great ideas, you will be able to understand the appropriate designs for a presentable model. Soon you will be joining exhibitions and contests. How do I start Railway Modeling? All hobbies start with the desire. Your desire to learn more about the hobby and discover new things that will keep you hooked on your model trains. You will start by learning how to create a permanent layout. A permanent layout is necessary for you to have in order to avoid packing and unpacking your setup. In creating a layout, there is no correct way to build a model railway. There are varieties of method on how to go on with this. Included in process of building the layout is to know the concept of scales and gauges. Scale is the term used in when referring to the size of the model compared to its full size version. Gauges, on the other hand, are the measurement between the rails on the actual or model track. Typical scales used are the HO and N scales. HO scale is built 1:87 scale while the N scale is built 1:160 scale. Starting the Layout For beginners, the starting point would be the board. If you lack skills in carpentry, you should be able to make a board that is easy to build or a ready-made one. Ideal sizes would be that of a table tennis table. With your baseboard in place, the next step is to lay down the track. The rails can be nailed straight to the board. A rail underlay is commonly placed to provide a good surface to on which the rails would be laid. This is also placed to regulate sounds and increase aesthetic value. Extra care is taken when laying down tracks in curves. Putting Your Track Work to Test After finishing your laying tracks, it is advisable to put it to test by rolling a carriage along. Place your train on the rails with power pack on. See the train navigate the track and check for possible sites of derailment. This is the perfect time to fix these problems before placing the ballast and sceneries. Adding the Sceneries and Ballast This is the part where you place the designs that would make your model visually appealing. The sceneries will create this effect for the railway. Common elements that are part of the sceneries are grass, road bridge, hills, roads, and more. (Want to be more creative? Check this out.) Materials in making sceneries comprised only of common house items. The grass can be made up of a green mats. The roads can be made of thick cards. Polystyrene foam can be made to create hills.The ballast is to be placed next to improve stability to your rails. You may also add new ideas and designs to your model by placing more details such trees, cars, and fences.
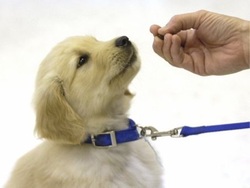
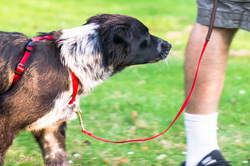 With many years of experience with dogs, you might observe that your pets listen to your command. With few daily exercises, you will notice more improvement. But once in a while, your dog goes back to its old habits and does not listen to you. These times could be very frustrating. There will come a point that you will think that you had just got lucky in making your pet follow. There is a reason not to feel bad because there is a science on how to train your dogs. All you need is determination and a little patience. Apply the Science First, you have to posses the right attitude in training dogs. As mentioned before, training requires patience. You will not accomplish anything if you keep on complaining. The dog will sense this and act oddly in the process. With your mind set on the training, bring some of your favorite dog treats. These treats are the tools you will use in getting the attention of your dog. It is better if the treats are in little pieces. Large pieces are hard to chew and will make your pet more aggressive. Closely place one treat near the dog’s nose. Make sure to have a firm grip on the treat while saying with a clear tone, “Sit.” You will not expect the dog to get it at the first try. You have to illustrate the proper “sit” position. You do not do the “sit” position yourself expecting your pet to mirror you. They are not that smart to understand that. Instead, give your pet’s rear end a little push downwards while keeping a firm grip on the leash. Once the dog listens to your command, reward it immediately with a treat. Praise it as needed. Repeat the command and allow it to do the same trick. Do the same steps until the dog masters it. Stop giving treats once you feel that the dog is comfortable with the trick. Now, that is how to train your dog to sit. It’s about Communication You should remember that they are also sensitive to loud sounds such as when nagging and shouting. These dogs also get scared. If you are frustrated with your dog, you rest and try again later or some other time. To punish the pet, a simple “No!” is enough. (Learn more by clicking here.) On the other hand, do not spoil your dogs with many treats. This practice is not healthy for your pet and could be costly on your part. The training could be exhausting for you and your pet, rest once in a while. Once both your body and your dog adapts with the routine, you can teach you pet new voice commands. Other fun-to-do commands are “stay”, “down”, and “stand.” Schedule your trainings in intervals to discourage fatigue. At all times, it is important for you to be gentle with your pet. When pushing its leg behind, apply only enough pressure to the legs, use of powerful force will injure it.
|
 RSS Feed